Build a Complete CRM in 2 Hours: Rails 8 Rapid Prototyping (Part 3)

TL;DR
Introduction
Building on last week's authentication and dashboard, we have about 45 minutes left in our 2-hour challenge. This week we're adding filtering and pagination to the companies page to make it actually usable for real work. If you haven't read last week's post yet, you should start there.
Why we're doing this and why it matters for your business: When stakeholders can interact with a functional prototype that looks and feels production-ready, buy-in happens 3x faster than with static mockups. I've seen this repeatedly with B2B SaaS companies validating new features—functional beats beautiful every time when it comes to early validation.
Let's dive straight in!
Pagination
⏱️ Elapsed time: 73:05 — Time remaining: 46:55
Pagination is crucial for keeping your overview pages manageable. Few people want to open a page that shows more than 50 items at once, especially when proper filters are available too. Pagination in Ruby on Rails is really straightforward, and there are many gems that'll help you out with this. We'll use kaminari for our database pagination since it provides enterprise-grade functionality with minimal setup. Let's first add it:
bundle add kaminari
Next, we need to add it to the queries where we want to use it and add the pagination buttons. First, we'll add it to the companies page:
# app/controllers/companies_controller.rb
class CompaniesController < ApplicationController
  # ...
  def index
    @companies = user_companies.page(params[:page] || 1).per(params[:per_page] || 10)
  end
  # ...
end
And then add the pagination helper to the view:
# app/views/companies/index.html.erb
<%= paginate @companies %>
I just added it to the bottom of the page. It works out of the box, but of course, it doesn't look that great. Let's generate the files that make up these buttons and style them. In our terminal, we should run the following command:
rails g kaminari:views default
This will allow us to style the buttons in the app/views/kaminari folder. I kept it easy. I added the following classes to all buttons except for the _page.html.erb buttons: btn btn-outline-primary. I added d-flex gap-1 justify-content-center to the paginator itself to give it some space. Then in the _page.html.erb I updated the span as follows:
<span class="page<%= ' current btn-primary' if page.current? %> btn">
Let's also add pagination for the companies we haven't contacted in a while on our dashboard. Let's update the controller first:
class DashboardController < ApplicationController
  include CompaniesUserable

  def index
    # ...
    @companies_to_contact = user_companies.where("last_contacted_at < ?", 2.weeks.ago)
                                          .or(user_companies.where(last_contacted_at: nil))
                                          .page(params[:page] || 1)
                                          .per(params[:per_page] || 10)
  end
end
And we need to add the buttons to the view. I put them underneath my table, but you could put them anywhere on the page you'd want.
<%= paginate @companies_to_contact %>
You might notice, if you click next page now, it scrolls to the top of the page, rather than to the top of the table with our company entries. To fix this, we need to anchor our paginator to our table. We already have the id='companies' on the table, so we can use this. Let's update the paginator as follows:
<%= paginate @companies_to_contact, params: { anchor: 'companies' } %>
Filtering
⏱️ Elapsed time: 77:11 — Time remaining: 42:49
Now that pagination is working smoothly, let's tackle the filtering system. We need to add some filters to be able to find companies quickly. Of course, the more columns we add to our company model, the more filters we might want. At the moment we only have the industries, names, and descriptions, so let's add filters for those.
First, let's create the filter interface. In our app/views/companies/index.html.erb we should add them. I did it like so:
<h1>Companies</h1>
<div class='w-100 d-flex flex-column flex-sm-row justify-content-between align-items-sm-center'>
  <%= link_to "New company", new_company_path, class: 'btn btn-outline-primary mb-2 mb-sm-0' %>
  <%= render 'filters' %>
</div>
Second, in the filters partial (app/views/companies/_filters.html.erb):
<%# app/views/companies/_filters.html.erb %>
<%= form_with url: companies_path, method: :get, local: true,
    class: "row g-2 align-items-center",
    data: { controller: "company-filters", company_filters_form_target: "form" } do |f| %>
  <div class="col-md-4">
    <%= f.select :industries, options_from_collection_for_select(Industry.order(:name), :slug, :name, params[:industries]),
        { prompt: "All Industries" },
        { class: "form-select form-select-sm", data: { action: "change->company-filters#change" } } %>
  </div>
  <div class="col-md-5">
    <%= f.text_field :search, value: params[:search], placeholder: "Search...",
        class: "form-control form-control-sm",
        data: {
          action: "input->company-filters#search",
          company_filters_search_target: "search"
        } %>
  </div>
  <div class="col-md-2">
    <%= link_to "Clear", companies_path, class: "btn btn-outline-secondary btn-sm" %>
  </div>
<% end %>
I already included a few data attributes for the JavaScript we're going to need. Let's make the company_filters_controller.js next.
// app/javascript/controllers/company_filters_controller.js
import { Controller } from '@hotwired/stimulus';

export default class extends Controller {
  static targets = ['search'];
  static values = { debounce: { type: Number, default: 500 } };

  connect() {
    this.timeout = null;
  }

  disconnect() {
    if (this.timeout) {
      clearTimeout(this.timeout);
    }
  }

  change() {
    this.element.submit();
  }

  search() {
    if (this.timeout) {
      clearTimeout(this.timeout);
    }

    this.timeout = setTimeout(() => {
      this.element.submit();
    }, this.debounceValue);
  }
}
Once we reload the page, we see the filters and can interact with them. However, they don't do anything yet except for adding the search fields to the url. We should make use of them. Create a lib folder in our app and in there, we create our company_filters.rb:
# app/lib/company_filters.rb
class CompanyFilters
  attr_reader :companies, :params

  def initialize(companies, params = {})
    @companies = companies
    @params = params
  end

  def filter
    filter_industries
    filter_text_query

    scope
  end

  private

  def scope
    @scope ||= base_scope
  end

  def base_scope
    companies
  end

  def filter_industries
    return unless params[:industries].present?

    industries = params[:industries].compact_blank.map(&:strip)
    industry_ids = Industry.where(
      "LOWER(name) IN (?)",
      industries.map(&:downcase)
    ).ids

    @scope = scope.where(industry_id: industry_ids)
  end

  def filter_text_query
    return unless params[:search].present?

    @scope = scope.where("LOWER(name) LIKE :query OR LOWER(description) LIKE :query", query: "%#{params[:search].downcase}%")
  end
end
As our base scope, we use the companies that we pass in. This makes it so we can reuse the filters for all companies, not just for the user's companies. We'll be looking for our industries in the params. For the text queries, we look at the name and the description. To make sure there won't be any capitalization issues, we use LOWER() everywhere. This ensures all text is lowercase.
Since we made a new lib folder, we need to tell Rails to automatically load it. For this, we should add the app/lib folder to the autoload paths in our config/application.rb (note: this is handled automatically in Rails 7+, but it's good to be explicit):
module CompanyCrm
  class Application < Rails::Application
    # ...
    config.autoload_paths += %w[app/lib]
    # ...
  end
end
Lastly, we need to actually use the filter in our companies_controller#index:
class CompaniesController < ApplicationController
  # ...
  def index
    @companies = filtered_companies.page(params[:page] || 1).per(params[:per_page] || 10)
  end
  # ...
  private

  def filtered_companies
    @filtered_companies ||= CompanyFilters.new(user_companies, params).filter
  end
  # ...
end
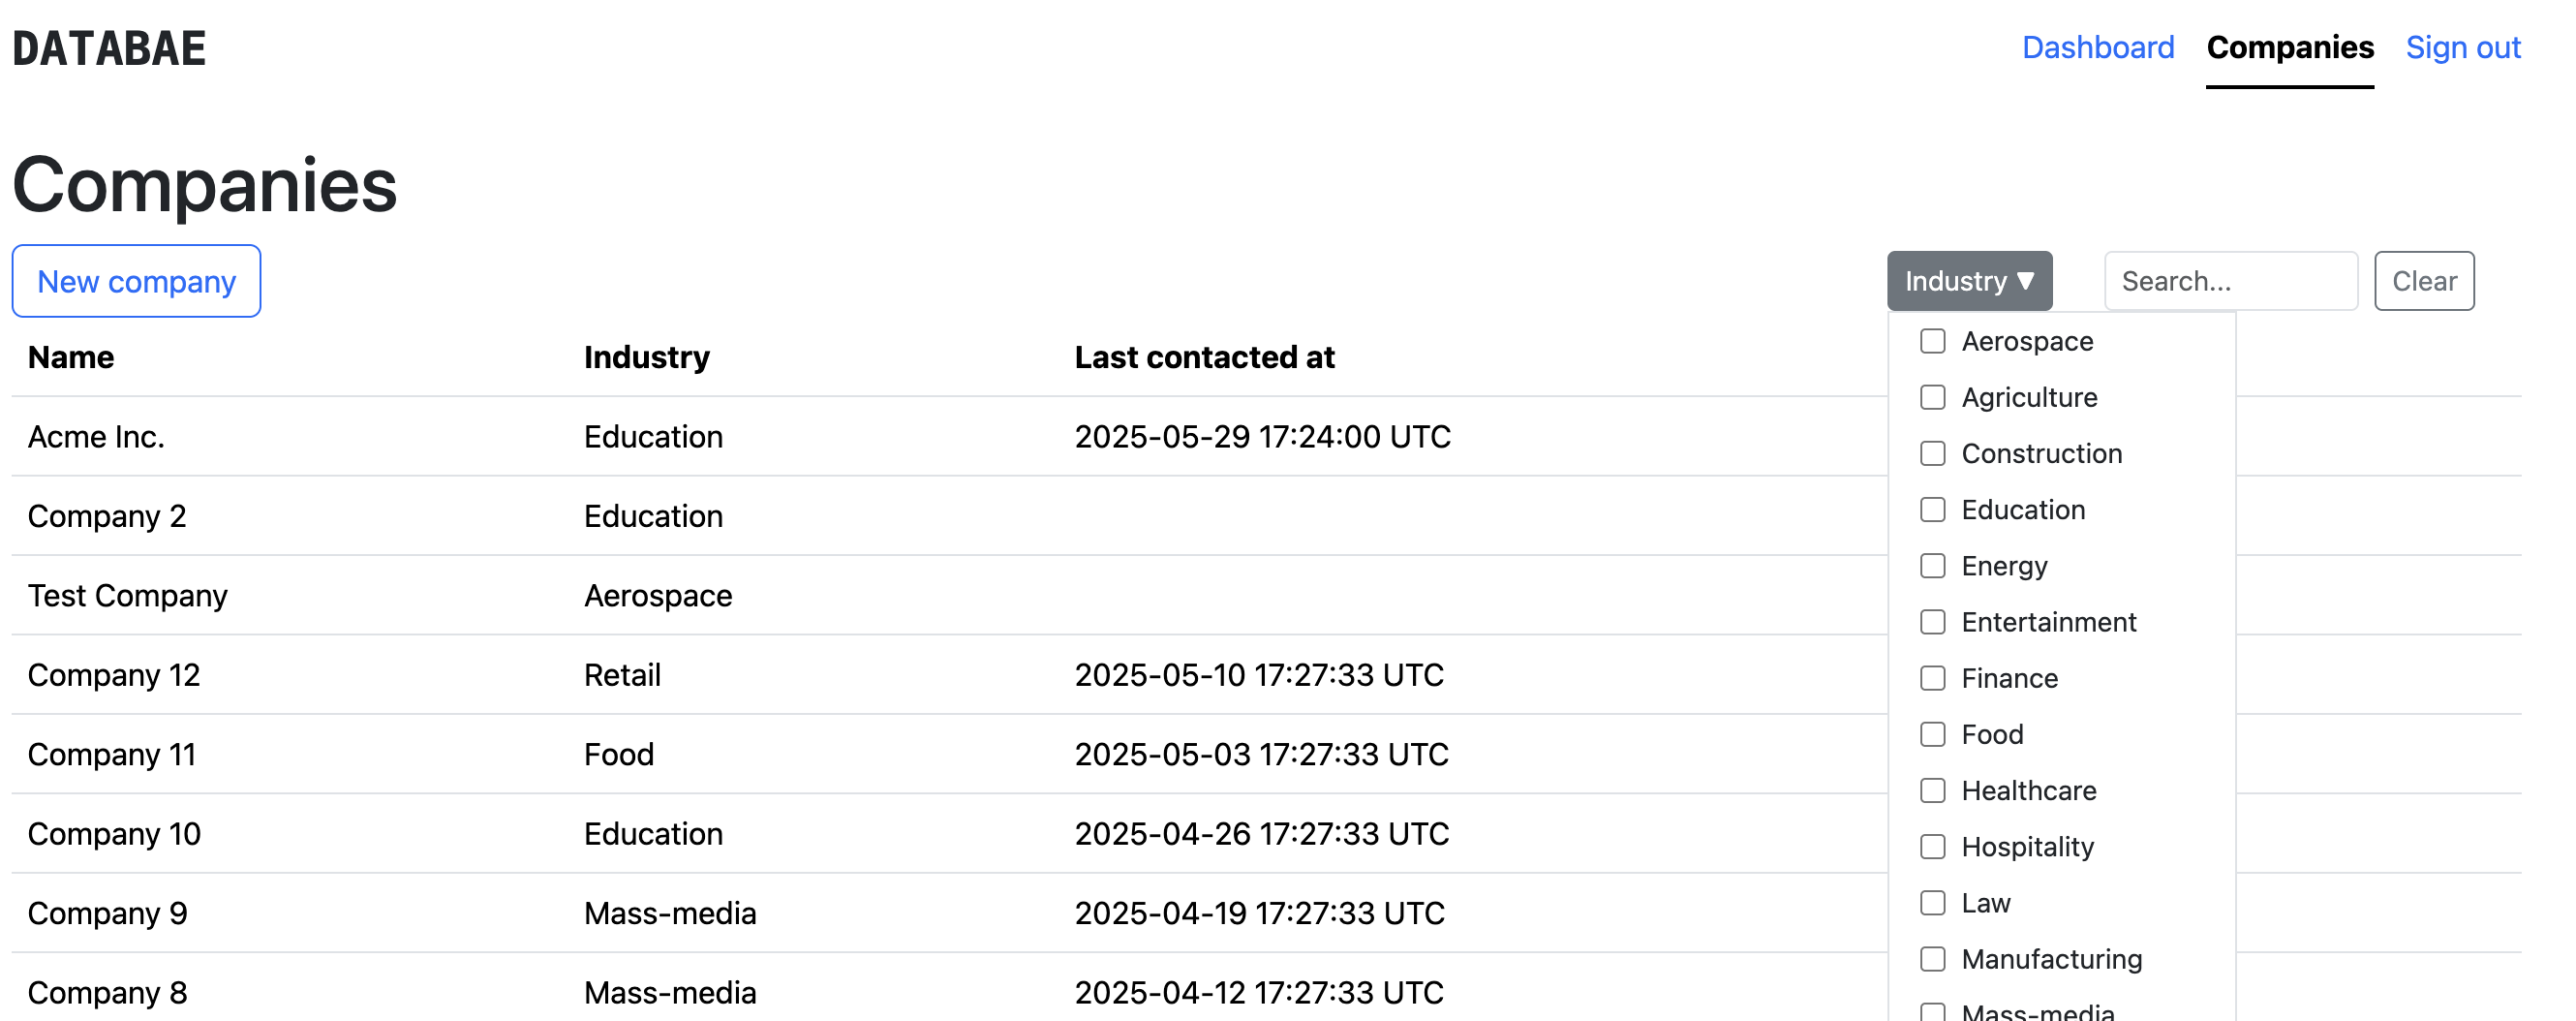
That's it for the main filters. Let's test them and filter for some industry. It turns out we didn't make our select a multi-select. That means right now we can only filter for individual industries. We could add a multiple: true attribute to the select, but I'm not a fan of how those work and look—they don't provide clear visual feedback and offer poor mobile experience. My idea is a dropdown with a checkboxed list.
Improving the industry filter
⏱️ Elapsed time: 97:12 — Time remaining: 23:48
To make the industry filters accept multiple values, we need to restructure our select component a bit. The issue with the select now is that it only allows the selection of one item, and the multiple select doesn't provide the UX we want. Therefore, we'll need to make our own dropdown for our select and populate it with our industry options, including checkboxes. Let's update our html first:
# app/views/companies/_filters.html.erb
<%# ... %>
  <div class='col-md-4 position-relative' data-controller="dropdown">
    <button type='button' class='btn btn-sm btn-outline-secondary d-flex gap-1 align-items-center ' data-action="click->dropdown#toggle">
      <span>
        Industry
      </span>
      <span data-dropdown-target="arrow">▼</span>
      <% if params[:industries].present? %>
        <span class="badge bg-primary d-flex justify-content-center align-items-center"><%= params[:industries].size %></span>
      <% end %>
    </button>
    <div data-dropdown-target="content" class='position-absolute d-none top-100 bg-white border min-w-max overflow-y-scroll max-h-[240px]'>
      <% Industry.order(:name).each do |industry| %>
        <div class="px-3 py-1 bg-hover d-flex flex-row flex-nowrap gap-2" role='button'>
          <%= check_box_tag 'industries[]', industry.name,
          (params[:industries] || []).include?(industry.name),
          {
            id: "industry_#{industry.id}",
            class: 'my-auto',
            data: { action: "change->company-filters#change" }
          } %>
          <%= label_tag "industry_#{industry.id}", industry.name,
          class: "form-check-label small",
          style: 'cursor: pointer;' %>
        </div>
      <% end %>
    </div>
  </div>
<%# ... %>
We added a data-controller="dropdown" which will interact with our dropdown controller. We have two targets, the arrow and the content. For our dropdown itself, we only need one action which we add on the button. On the industry checkboxes themselves we now add the company-filters change handler, the one which was on our select element before. Now let's add our JavaScript controller:
// app/javascript/controllers/dropdown_controller.js
import { Controller } from '@hotwired/stimulus';

export default class extends Controller {
  static targets = ['content', 'arrow'];

  connect() {
    this.closeOnOutsideClick = this.closeOnOutsideClick.bind(this);
  }

  toggle() {
    this.contentTarget.classList.toggle('d-none');

    if (!this.contentTarget.classList.contains('d-none')) {
      document.addEventListener('click', this.closeOnOutsideClick);
    } else {
      document.removeEventListener('click', this.closeOnOutsideClick);
    }
  }

  closeOnOutsideClick(event) {
    if (!this.element.contains(event.target)) {
      this.contentTarget.classList.add('d-none');
      document.removeEventListener('click', this.closeOnOutsideClick);
    }
  }
}
Note how we also add an outside click listener to enable closing the dropdown by clicking anywhere. On toggle we toggle the d-none class, which is just a Bootstrap utility class that adds a display: none to the content element. I added a small style thing to the dropdown elements, with a bg-hover. This isn't a utility class from Bootstrap, but rather one that I added myself. To make that work, add the following in app/assets/stylesheets/application.bootstrap.scss:
.bg-hover:hover {
  background-color: lightgray !important;
  cursor: pointer !important;
}
Since we already set up the company filter to expect industries rather than just one, that filter should work out of the box with our new dropdown. After testing a few times, I do see something that I do not like though. If you only search for an industry, for example Construction, in the url an empty search query gets added: http://localhost:3000/companies?industries%5B%5D=Construction&search=. While is it not technically wrong, I don't like it, since it adds more overhead for the user to look at. We can very easily remove this by improving our company_filters_controller.js.
// app/javascript/controllers/company_filters_controller.js
import { Controller } from '@hotwired/stimulus';

export default class extends Controller {
  // ...
  connect() {
    this.timeout = null;
    this.clearEmptySearchParams();
  }
  // ...
  clearEmptySearchParams() {
    const oldParams = new URLSearchParams(window.location.search);
    const newParams = new URLSearchParams();

    oldParams.forEach((value, key) => {
      if (value && value.trim() !== '') {
        newParams.append(key, value);
      }
    });

    const newUrl = `${window.location.pathname}${newParams.toString() ? '?' + newParams.toString() : ''}`;
    window.history.replaceState({}, '', newUrl);
  }
}
This method creates a new URLSearchParams object with only those params that have a value which is not equal to an empty string.
End of part three
⏱️ Elapsed time: 117:14 — Time remaining: 2:46
We're almost out of time, but I think we've got a really solid MVP set up. We've successfully implemented pagination for our company lists and we can filter through the industries as well as search through the descriptions and company names. The filtering is responsive, the pagination works smoothly, and the whole thing feels production-ready.
Let's finish with some nice screenshots of the application:

In Part 4, we'll focus on deploying our completed MVP to DigitalOcean1 using Kamal2 and DockerHub3 to make it accessible online.
Ready to transform your next business concept into a stakeholder-ready prototype in hours, not weeks? This rapid prototyping approach is particularly effective for companies and startups validating new features or consultancies demonstrating capabilities to prospective clients. Let's talk about how rapid prototyping can accelerate your path to market.
Footnotes
-
DigitalOcean: The simplest cloud that scales with you. https://www.digitalocean.com/ ↩
-
Kamal: Deploy web apps anywhere. From bare metal to cloud VMs. https://kamal-deploy.org/ ↩
-
DockerHub: Cloud-native software deployment made easy. https://hub.docker.com/ ↩